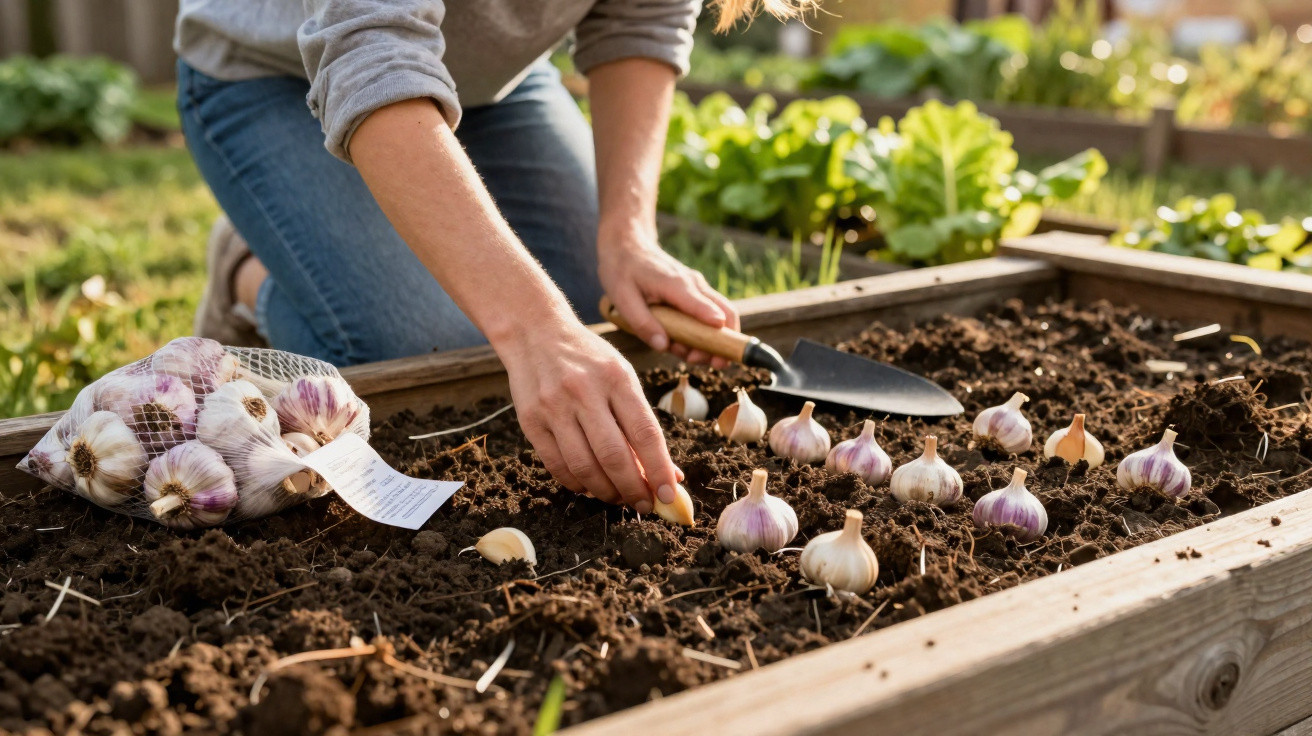
What often ends up as a leftover in a kitchen garlic net can become an impressive row of home-grown garlic bulbs in the vegetable patch. With one simple trick, by consistently avoiding a single mistake, and with a little patience, this supermarket item can turn into a surprisingly productive gardening project.
Why supermarket garlic makes sense in the vegetable patch
Garlic is among the least demanding crops in a kitchen garden. It needs very little attention, thrives in sunshine, copes with relatively lean soil and resists many pests. That is precisely why it makes sense to use shop-bought bulbs directly instead of buying costly planting stock.
The main attraction is clear: garlic sold in nets is inexpensive, available almost everywhere and ideal for gaining initial growing experience without much risk. Every individual clove can potentially develop into a complete bulb. Once you understand the principle, that inconspicuous net on the supermarket shelf takes on a very different meaning.
“A single net of supermarket garlic can, when used correctly, produce whole rows of harvest-ready bulbs.”
There is one catch, however: some commercially sold garlic is treated to stop it sprouting too quickly in the shop. This treatment can reduce its willingness to grow in the bed. That does not mean every bulb is unsuitable, but it does mean a more strategic approach is worthwhile.
The most common mistake: unsuitable soil ruins everything
The one factor that can make the entire project fail is the soil. If it is too wet, drains poorly or is even waterlogged, the experiment ends in rot rather than a plentiful crop. Garlic hates having wet feet.
Anyone who simply plants an entire bed in a hollow or in heavy clay risks fungal diseases, rotting cloves and persistent soil problems. This is exactly the situation that makes many amateur gardeners abandon the project in frustration.
“The most important rule is: never plant into permanently wet soil – otherwise the money-saving trick turns into a source of disease.”
A loose, crumbly, free-draining soil in full sun is ideal. In areas with frequent rain, a small trick helps: plant the cloves in a slightly raised bed or on low ridges, around ten centimetres above normal ground level. This allows excess water to drain away.
How to choose suitable supermarket garlic
If you want to plant supermarket garlic, do not select it at random. Certain features clearly indicate a better chance of success:
- garlic that is organic where possible
- firm, plump cloves with no soft patches
- no visible mould
- no dark marks around the base
- ideally, a slightly visible shoot already emerging
Another professional tip is to reserve the largest cloves strictly for planting and use the smaller ones in the kitchen. Large cloves are highly likely to produce larger, more vigorous bulbs.
“By planting the thickest cloves and eating the thinner ones, you can actively influence the size of the later harvest.”
The clever cold treatment: encouraging garlic bulbs to grow
Garlic responds well to a short period of cold. In commercial cultivation, this refers to a phase in which cloves are stored somewhere cool before going into the ground. It is remarkably easy to replicate at home.
Place the selected cloves, still unpeeled, in the fridge for one to two weeks. This artificial “winter phase” activates the garlic’s internal clock. Afterwards, carefully separate the individual cloves from the bulb without removing their skins.
Cloves showing a small white or green shoot after chilling are especially suitable. All the others can simply go into the frying pan. This ensures that only material with a high likelihood of sprouting goes into the bed.
Planting garlic: spacing, depth and the right position
For anyone planting garlic for the first time, one straightforward rule makes the task easy: plant each clove around three to five centimetres deep, with the pointed end facing upwards, and leave roughly ten to fifteen centimetres between cloves.
In very heavy soil, one additional step is worthwhile: build the bed into a shallow ridge before planting and place the cloves in the raised section. This keeps the root area dry enough to prevent rot.
| Step | Recommendation |
|---|---|
| Soil preparation | Loosen the soil, remove large stones and raise it slightly if necessary |
| Planting depth | 3–5 cm of soil above the clove |
| Spacing within the row | 10–15 cm |
| Distance between rows | 20–25 cm |
| Position | Full sun and well-drained soil |
Care: minimal effort, impressive yield
Once garlic is in the ground, it needs very little work. Even keen waterers need to hold back: in average years, occasional watering is enough, and intervention is only needed during prolonged dry spells. Stop watering altogether a few weeks before harvest so the bulbs can mature and store more effectively.
Deal with weeds mainly by mechanical means: lightly hoe the soil or weed by hand, taking care not to damage the shallow roots. Fertiliser should be used sparingly, as too much nitrogen encourages leaves but slows bulb formation.
Disease protection and crop rotation
Although garlic is fairly robust, fungal diseases become more common in wet soil. It is best to remove wilted leaves with brown spots or heavily rusted stems promptly and take them away from the bed. This helps limit sources of spores.
Crop rotation is another frequently underestimated factor. Garlic should not be grown in the same space directly after other alliums, such as onions, leeks or garlic. Leaving a gap of three to four years reduces the risk of building up particular diseases.
Harvesting, drying and storing home-grown garlic bulbs
The foliage provides the clearest sign of the right harvest time. When around two-thirds of the leaves have turned yellow and collapsed, it is worth checking beneath the soil. If you carefully lift a test plant, you will usually find well-formed bulbs with clearly visible cloves.
Pull the plants from the soil on a dry day, shake off most of the earth and allow them to dry initially on the bed or in an airy, shaded place. The bulbs can then be hung upside down in bundles or laid on racks until their skins feel completely dry and papery.
“Properly dried garlic often keeps for several months in an airy, shaded store – far longer than garlic sold in nets in a kitchen cupboard.”
Set aside some of the best-looking bulbs immediately as stock for the next planting. Gradually, this allows you to establish your own adapted strain that copes well with conditions in your garden.
Garlic as a helpful companion in a mixed bed
Besides producing its own harvest, garlic offers another benefit. Many gardeners plant it deliberately among other crops because its distinctive scent is thought to keep unwanted visitors away. Particularly alongside carrots, strawberries or roses, many report lower pest pressure when garlic is nearby.
It does not, however, grow well with legumes such as peas and beans. Keep it at a distance from these crops to avoid competition and growth problems.
What beginners should pay particular attention to
Anyone trying this experiment for the first time is well advised to start with small test areas. Plant half a bed with carefully checked supermarket garlic and the rest with conventional planting stock, then compare the results. You will soon see which bulbs perform well in your own garden.
For balcony gardeners, growing garlic in deep troughs or containers is a good option. Drainage can be controlled effectively there, for example with a layer of expanded clay at the bottom and loose compost above it. The key point is to avoid waterlogging, even in pots.
Shop-bought garlic does not entirely replace certified planting stock, but it can be an exciting additional experiment, especially for anyone who enjoys making something new from “leftovers”. By avoiding the one cardinal error of wet soil, you achieve two things at once: less kitchen waste and an aromatic garlic harvest of your own in the garden.









Comments
No comments yet. Be the first to comment!
Leave a Comment