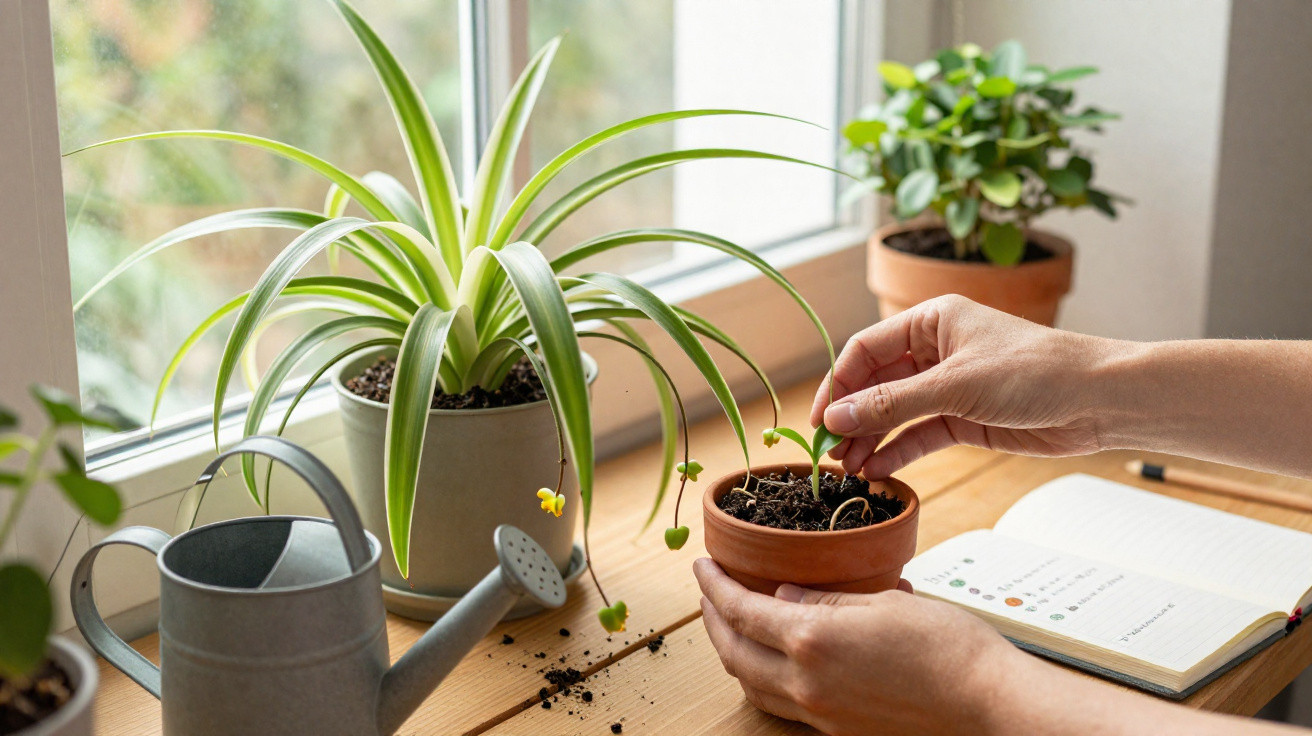
With three simple adjustments, the switch can suddenly flip to “baby boom”.
Anyone bringing a spider plant (botanical name: Chlorophytum comosum) into their living room often imagines a lush hanging basket, with long shoots carrying dozens of tiny plantlets. Yet in reality, many people end up with nothing but leaves in a pot and not a single offset. That can be frustrating, but there are specific causes that can be changed deliberately.
Why your spider plant is not producing offsets
A spider plant’s “babies” are, technically, small plantlets that grow at the tips of long, arching shoots. These shoots emerge after the plant has flowered with its modest white, star-shaped blooms.
When offsets do not appear, it is almost never because you bought the “wrong” or a “male” plant. This persistent myth is simply untrue. Spider plants produce bisexual flowers and can reproduce both through seeds and through these baby plantlets.
“In most homes, a lack of new growth is not down to the variety, but to three factors: unsuitable light, too much comfort and too little encouragement to reproduce.”
Common reasons a spider plant has no offspring include:
- The plant is still too young – it usually needs around a year before it is mature enough to flower.
- Insufficient light – without enough brightness, it remains in “survival mode” and produces leaves only.
- An oversized pot and too much fertiliser – in that case, it directs its energy into roots and foliage rather than flowers and offsets.
Put simply, spider plants are often too comfortable. If you want to see new plantlets, you need to provide conditions that challenge the plant slightly without making it suffer.
Key number 1: the right light for plenty of spider plant offsets
Spider plants thrive in bright, indirect light. This is where the route to a shower of offsets begins.
Choosing the right position
- Directly in front of an east- or west-facing window
- A short distance from a south-facing window, so midday sun cannot scorch the leaves
- In a genuinely bright room, rather than a dim corner at the back of the living room
In a position that is too dark, a spider plant will still photosynthesise, but only at low capacity. It may make leaves, yet it will not flower – and without flowers, there will be no shoots carrying baby plants.
Why a proper night matters
Day length is where it gets interesting. Studies show that the production of offsets is linked to the length of daily light exposure. Spider plants respond to a particular balance of day and night.
“A few weeks with fewer than twelve hours of intense brightness a day, combined with genuinely dark nights, are ideal.”
In practical terms, this means:
- During the day: give it as much window light as possible
- In the evening: dim the room lighting or close the curtains
- At night: avoid constant light from lamps or exceptionally bright advertising displays outside the window
A spider plant placed beside a floor lamp that is always on, or in a hallway exposed to continual lighting, loses this natural day-and-night rhythm. A deliberately created dark phase acts as a starting signal for flowers and, later, the sought-after baby-bearing shoots.
Key number 2: the pot can be quite snug
The second adjustment concerns the growing medium. Spider plants develop fleshy roots that store reserves and gradually fill the entire pot. That is exactly what you want.
Many amateur gardeners move their plant into a large outer pot too early. The result is that the roots have excessive room: the plant is living in a luxury suite, growing vigorously and looking healthy, but it has no intention whatsoever of reproducing.
“A slightly pot-bound spider plant produces flowers and offsets far more often than one sitting in a half-empty container.”
When repotting is genuinely worthwhile
A quick check can help you decide:
- Can you lift the plant easily from its pot?
- Can you see a dense network of firm, pale roots?
- Are roots already emerging from the drainage hole or lifting the root ball?
If so, move up by one pot size only; never leap from a 12 cm pot to a huge 24 cm container. Use an airy, free-draining houseplant compost with a slightly acidic pH of around 6–6.5.
Nutrients matter too: excessive fertiliser sends a spider plant into “leaf bodybuilding” mode. For offsets, it is better to:
- Feed lightly every 3–4 weeks in spring and summer
- Fertilise less, or not at all, in autumn and winter
- Never leave it standing in waterlogged compost – pour away excess water from saucers
Key number 3: the 3-week plan for maximum offspring
Anyone aiming for lots of baby plants can give their spider plant a small “offset kick-start”. It is easy to incorporate into everyday care.
The initial check-up
- Check its age: the plant should be at least one year old.
- Inspect the roots: firm, light-coloured roots without rot show that it is healthy.
- Adjust the pot size: choose only a slightly bigger pot if the root ball is genuinely crammed in.
- Monitor the temperature: 15 to 25 °C is ideal; avoid cold draughts.
The 3-week schedule at a glance
| Aspect | Action |
|---|---|
| Light | Bright position directly by a window, with fewer than 12 hours of strong brightness each day |
| Night | Reduce light in the evening; ideally use a dark room without continuous illumination |
| Watering | Water when the top layer of compost is dry; extend intervals in winter |
| Fertilising | Use sparingly, preferably at half strength |
| Pot | Keep it slightly pot-bound; do not carry out an XXL repotting job |
Under these conditions, curved flower stems will usually develop, followed by small white flowers – and then the long-awaited miniature spider plants at the ends.
How to propagate the new plantlets properly
As soon as the offsets show a few roots of their own, or at least small root buds, you can use them to expand your collection or give them to friends.
Three standard methods work well:
- Pot them up directly: cut off the baby plant and place it in a small pot of lightly moist compost. This is ideal when several roots are already visible.
- Start them in a glass of water: place the offset in a glass of water until roots form, then pot it up. This is useful when the root beginnings are still tiny.
- Place a pot underneath: put a small pot of compost beneath the offset and secure the plantlet to it, while leaving the shoot attached. Only cut it free once the offset has established itself firmly in the new pot.
“Three simple steps are enough to turn an older, well-established spider plant into a small plant nursery.”
Common spider plant care mistakes
Even with good intentions, people who do not get results often fall into these traps:
- Constantly wet compost: the roots rot, and the plant spends all its energy trying to recover instead of flowering.
- Drastic changes of position: moving it to a different spot every few days creates unnecessary stress.
- Rooms that are too cold: below 10 °C, conditions become difficult and the spider plant concentrates solely on survival.
- Severe nutrient deficiency: if it receives no fertiliser at all for years, it becomes weak and reluctant to flower.
Anyone who keeps these points in mind and gets the three keys right – light, pot size and the night-time dark phase – has an excellent chance of a pot full of shoots and baby plantlets.
Why spider plants are ideal housemates
Spider plants are not only considered easy to care for; they are also very forgiving. Their storage roots help them cope remarkably well with short dry spells. These root tubers hold water and nutrients and contain various minerals, which is one reason the plant appears so robust.
In many homes, spider plants sit near desks or in bedrooms. They contribute to a pleasant feel indoors, use their leaves to filter dust particles from the air, and simply add more visual life. If they also produce offsets regularly, you will always have small, fast-growing gifts ready to give – from a student kitchen to an open-plan office.
So, if you are looking at a deep-green but childless spider plant, there is no need to replace it. A close look at the light, pot size and night-time darkness is usually enough to turn it within a few weeks into a lush hanging plant with entire chains of baby spider plants.







Comments
No comments yet. Be the first to comment!
Leave a Comment