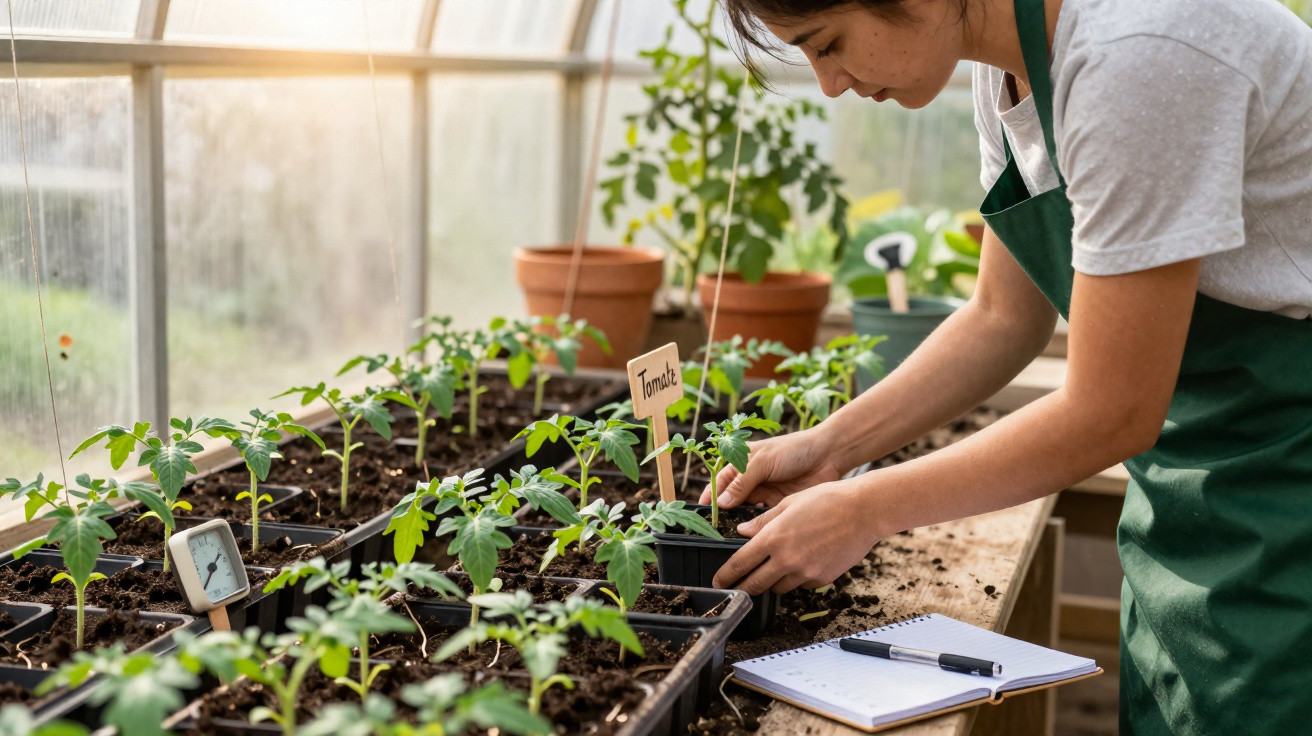
Seed packets are waiting and enthusiasm is high, but nights outdoors are still chilly. This is where a greenhouse comes into its own, whether it is a large structure in the garden or a compact version on a balcony. Starting tomatoes under cover gives them a head start of several weeks and brings the harvest forward considerably. Most disappointments are caused not by a lack of gardening enthusiasm, but by poor timing and a few easily overlooked details.
Why sowing tomatoes in a greenhouse makes such a difference
Tomatoes originally come from warmer climates. During spring in our part of the world, they face two main challenges: cold nights and insufficient light. A greenhouse helps tackle both at once.
Even an unheated glass or polythene greenhouse retains warmth from the sun during the day. Its soil and seed trays do not cool down as sharply overnight as they would outside. These are exactly the conditions tomato seeds need to germinate reliably.
“In their first few weeks, tomatoes receive what they need most in a greenhouse: substantially more light and steadier temperatures.”
Compared with a windowsill, light is spread more evenly in a greenhouse. Seedlings do not have to grow “towards the window”, so they avoid becoming excessively tall and spindly and instead develop short, sturdy stems. The result is markedly tougher plants that cope much better with later temperature fluctuations.
There is another benefit, too: regular ventilation prevents humid, stagnant air from building up, which is where fungal diseases and the dreaded damping-off disease in seedlings spread especially quickly.
Ideal conditions for tomato seedlings: temperature, light and moisture
For tomato germination (botanical name: Solanum lycopersicum), the substrate temperature matters above all else. The ideal range is between 20 and 22 degrees, while temperatures up to around 27 degrees are still acceptable. Within this range, the first shoots generally emerge after five to ten days.
In an unheated greenhouse at the end of winter, overnight temperatures are often too low. Anyone wishing to make an earlier start can provide a little technical assistance:
- a heat mat beneath the seed trays
- a heating cable in the base of a cold frame
- an insulating layer beneath containers, such as a polystyrene board
Moisture is just as crucial. Compost should remain evenly damp, never wet. Waterlogging causes rot and fungal problems, whereas overly dry compost can cause seedlings to wither before they properly emerge.
A cover, such as the lid of a mini-greenhouse tray, clear plastic film or a propagator lid, initially creates a warm, humid microclimate. Once the first green shoots appear, however, the cover needs to be opened gradually.
“The biggest source of errors is leaving the lid shut for too long: condensation drips onto the seedlings and fungi can take hold easily.”
Timing tomato sowing: when seeds should actually go into the compost
Rather than following the calendar rigidly, it is worth checking the expected final frost in your own area. The sowing date can then be calculated back from that point with reasonable accuracy.
| Region | Typical timing of the last overnight frosts | Recommended greenhouse sowing period |
|---|---|---|
| Mild wine-growing areas | Early to mid-April | Mid-February to early March |
| Central Germany / Alpine foothills | Mid- to late April | Late February to mid-March |
| Cool locations / higher-altitude regions | Early to mid-May | Early to late March |
Tomato plants need roughly six to eight weeks between sowing and planting out in a bed. Sowing much earlier risks producing leggy, weak plants that must wait for weeks in cramped conditions before outdoor temperatures finally become suitable.
How to sow tomatoes successfully in a greenhouse
The individual steps may sound straightforward, but following them consistently makes a decisive practical difference.
1. Prepare suitable containers and compost
The following are suitable for raising tomato plants:
- small pots, for example 8 cm in diameter
- seed trays
- cell trays with individual compartments
Good drainage is more important than the container shape. No container should sit in water for long periods. Fine seed compost works particularly well: it is low in nutrients, loose in texture and free from coarse pieces. This encourages a dense root system without making the plants overly lush.
Moisten the compost lightly before adding the seeds. Compost that is too wet tends to compact, while dry compost makes it harder for seeds to establish.
2. Sow at the right depth and label everything
One or two seeds per pot or cell are enough. Sow them around half a centimetre deep, then cover them lightly with compost and press it down only gently.
“Anyone who labels every variety carefully will avoid plenty of guesswork later among the mass of young plants.”
A simple plastic label or a wooden stick marked with the variety name will do. Then place the containers in the greenhouse or mini propagator and cover them.
3. Monitor the first ten days
At this stage, check them briefly every day. The compost must never dry out, but it should not look soaking wet either. A spray bottle is useful for moistening the surface without washing the seeds away.
As soon as the first delicate loops of seedlings emerge, open the cover slightly. Increase the ventilation over the following days until the lid can be removed altogether. This gradually acclimatises the young plants to drier air.
Pricking out and hardening off: turning seedlings into strong tomato plants
Once plants have two or three “true” leaves, in addition to their first seed leaves, the seed container becomes too cramped. This is the time for the most important care task: pricking out, or moving them into larger pots.
One technique often surprises beginners: tomatoes tolerate being planted deeper when repotted. The buried section of stem produces additional roots, creating a stronger root ball later on.
“The deeper tomatoes sit when they are repotted, the sturdier and more resilient they become in the bed.”
After pricking out, keep the young plants in the greenhouse. Good air circulation and as much light as possible are now vital. Open the door or windows on sunny days, and cover plants with horticultural fleece on frosty nights if necessary.
The “hardening-off phase” begins during the final ten to fourteen days before planting outdoors permanently. Leave the greenhouse door open more frequently during the day, allowing temperatures to fluctuate more. This helps the plants adapt gradually to garden conditions.
Common tomato seedling problems and how to prevent them
Long, thin and unstable seedlings
The cause is almost always too little light combined with air that is too warm. To put this right:
- place containers in the brightest part of the greenhouse
- open the cover early after germination
- do not raise tomatoes over a fan heater that overheats the air
Seedlings that collapse or rot
The typical signs are wet compost and tiny plants folding over at their base. Fungi are responsible, encouraged by waterlogging and insufficient ventilation. Take the following measures:
- keep compost damp rather than wet
- ventilate regularly, including briefly on cool days
- use clean containers and fresh, high-quality seed compost
A mini greenhouse on the balcony: small space, significant results
A garden is not essential for growing strong tomato plants. A slim mini greenhouse or a multi-tier greenhouse shelving unit on a balcony is already sufficient. It creates a sheltered environment surprisingly close to that of a full-sized greenhouse in the garden.
The same principles apply here: seed compost, careful watering and regular ventilation. A south-facing balcony can become extremely hot inside. Be sure to open the cover on sunny days, otherwise the delicate plants may scorch.
Why the effort is worthwhile - and what experienced gardeners watch for
Raising tomatoes from seed in a greenhouse offers enormous freedom when choosing varieties. Many rarities can be grown, from old, flavoursome beefsteak tomatoes to colourful cherry varieties that are scarcely available in shops.
It also builds a better understanding of what plants need. Anyone who has seen a strong, home-raised tomato plant withstand its first summer storm with ease is unlikely to want to return to pale plants from a DIY shop.
Experienced gardeners also use small temperature adjustments: slightly cooler greenhouse nights slow overly rapid upward growth, while sufficiently warm daytime temperatures encourage root development. In well-managed hobby greenhouses, plants are often ready by late April with thick stems and dark foliage - an early advantage that later delivers a long, reliable harvesting season.

Comments
No comments yet. Be the first to comment!
Leave a Comment