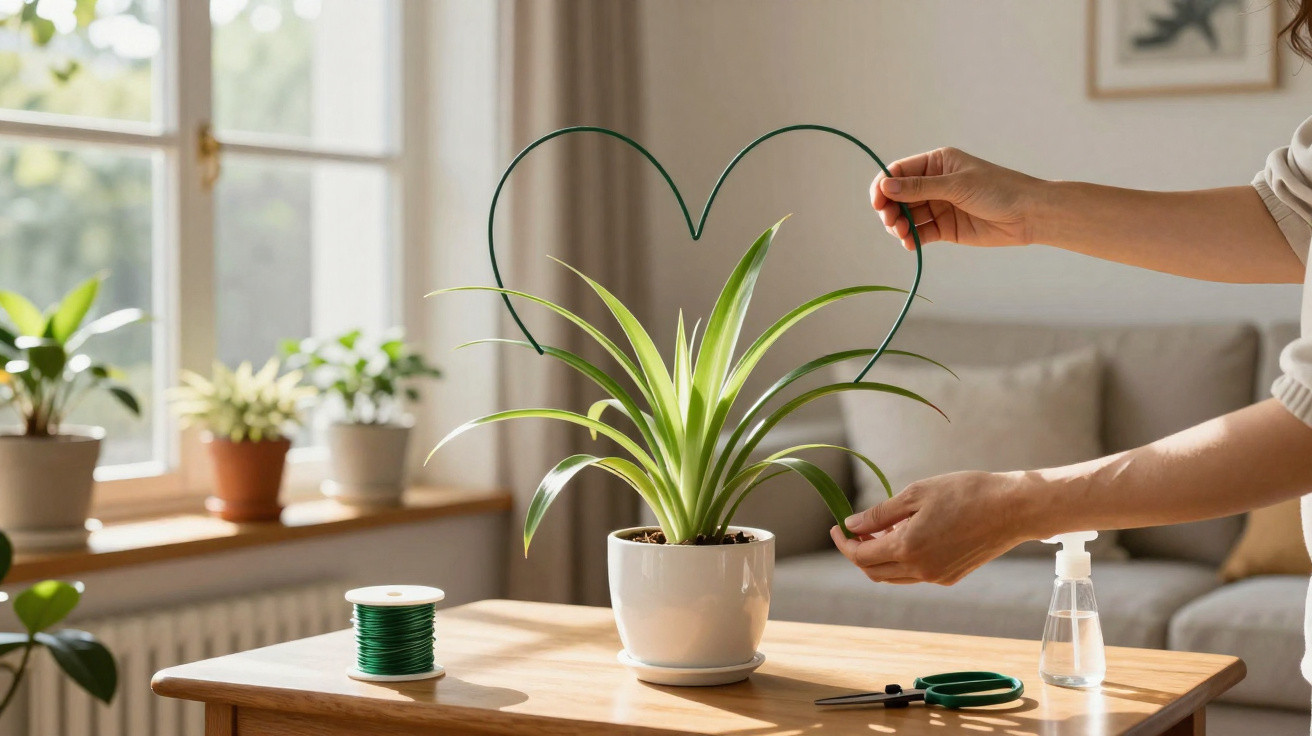
Many homes have one, yet hardly anyone truly notices it: the spider plant. This hardy houseplant classic is often relegated to the furthest corner because it is easy to care for, rather than because it makes a visual statement. One targeted technique can change that entirely: everyday greenery becomes a living plant sculpture that looks as though it belongs in an interiors magazine.
The underrated houseplant: why the spider plant is ideal for plant sculptures
The spider plant, botanically known as Chlorophytum comosum, originates from South Africa and has been a windowsill staple for decades. It forgives watering mistakes, copes with dry centrally heated air and is considered non-toxic to dogs and cats. It is, in principle, ideal for anyone without green fingers – but visually, it is often treated as a supporting act.
Its long green-and-white striped leaves typically form a dense central clump. Long, slender shoots grow from this point, each carrying small rosettes at the ends. These miniature plants cascade down like a curtain, giving the spider plant its distinctive appearance.
“It is precisely these trailing shoots that hold the key: they allow the spider plant to be deliberately shaped into forms, from hearts to braided columns.”
The shoots are remarkably flexible. By guiding them gently, it is possible to create striking graphic shapes without harming the plant. This makes the spider plant an excellent choice for living decorative pieces that cost little yet instantly alter the feel of a room.
Turning a potted spider plant into a green sculpture
Before shaping begins, inspect the plant carefully. Which shoots are the strongest? Which ones carry the greatest number of small rosettes? The healthier the shoots, the more successful the finished effect will be.
Step 1: Choose the right shoots
- Select shoots that already carry several miniature rosettes.
- Allow weak or very short shoots to grow for now.
- If necessary, cut off an excessive number of rosettes and pot them up separately.
The removed baby plants can be rooted easily in a second pot or directly around the edge of the existing pot. Over time, this produces a much denser base, making the eventual sculpture appear considerably fuller.
Step 2: Shaping with wire – circles, hearts and crowns
For the first option, all that is needed is a thin yet shape-retaining metal frame. Aluminium craft wire is particularly suitable: it is lightweight, resistant to rust and easy to bend.
Here is how to do it:
- Bend the wire into a circle, oval or heart.
- Secure the frame in the pot or attach it to a stake.
- Loosely position the selected shoots around the wire without creasing them.
- Carefully fasten them using soft plant ties or raffia.
The rosettes along this “route” gradually grow closer together, reinforcing the outline. With very little material, a plain pot can become a green ring, a crown-like feature or a botanical heart.
“A planted spider plant ring makes a far more impressive centrepiece for a celebratory table than any standard vase – and it can be used throughout the year.”
Step 3: Braided columns – a spider plant totem
The second method adds height to the plant. It is especially well suited to homes with limited surface space, such as beside the sofa, at the end of a TV unit or in narrow alcoves.
You will need:
- several longer spider plant shoots
- a sturdy wooden stake for support
- soft tying materials, such as raffia or rubber plant ties
Loosely braid the shoots like hair, guide them around the wooden stake and secure them at intervals. This creates a green column that continues upwards. Smaller rosettes spill from the sides and soften the overall look. The result resembles a small living totem, making it ideal for visually filling an empty corner.
Where spider plant sculptures work best in the home
The impact on the room changes considerably according to the form. Typical places to use them include:
| Shape | Position in the home | Effect |
|---|---|---|
| Wreath / ring | Dining table, coffee table | Relaxed focal point that draws the eye without blocking the view |
| Heart shape | Hall console, chest of drawers, celebratory table | Romantic accent, ideal for parties or gifts |
| Braided column | Alcove beside an armchair, end of a shelf, bedside table | Vertical feature that makes the best use of narrow areas |
In small rooms especially, slender sculptures bring in a touch of nature without taking up valuable surfaces. A compact braided column on a bedside table feels calmer than a bulky bouquet, and it does not need replacing constantly.
Care after shaping: keeping the sculpture healthy
After bending and securing it, the spider plant benefits from a little support to regain its vigour. A liquid fertiliser containing a small number of clearly defined main nutrients, added to the watering water every two to three weeks, is helpful.
The basic care rules remain unchanged:
- Let the compost dry out slightly, then water thoroughly.
- Do not allow water to sit in the outer pot.
- Choose a bright position away from harsh midday sun.
In mild regions roughly corresponding to climate zones 10 and 11, the plant can also be kept on a balcony or terrace when temperatures remain above around 13°C. Braided columns look particularly impressive there, for example beside the front door or at the edge of a seating area.
What can go wrong with plant sculptures – and how to avoid it
Working too quickly or too roughly can cause shoots to snap. The result is dried-out sections and unattractive gaps in the structure.
Common mistakes and ways to prevent them:
- Tying too tightly: Always leave a little room so the shoots can continue to grow.
- Doing too much at once: Shape the plant gradually over several days instead of bending everything in one session.
- Choosing the wrong location: Direct sunshine weakens the delicate rosettes, while dark corners slow growth considerably.
Anyone who works carefully will soon see how pliable the shoots are. Minor adjustments every few weeks are enough to maintain the shape.
Why this trick is practical as well as attractive
Training the plant into a sculpture solves a common issue: sprawling leaves that overrun tables and shelves. Rings, hearts and columns shift the emphasis upwards, significantly reducing the width the plant occupies. This can make a real difference in one-person flats, home offices or compact city homes.
At the same time, the results are completely individual. No two spider plants grow alike, so every sculpture remains one of a kind. Anyone who enjoys crafting can experiment with different wire shapes, combine several pots or display the spider plant alongside other plants, such as ivy or compact succulents.
“By deliberate shaping, an inexpensive and often underestimated plant becomes a decorative object that can easily rival expensive designer vases.”
As an added benefit, even novice plant owners get to know their houseplant better: how does it respond to light? How quickly do the shoots grow back? How dense does the base become when extra rosettes are added? Observing these details means the spider plant is no longer seen as an interchangeable furnishing accessory, but as a living housemate that can become a green sculpture with little effort.


Comments
No comments yet. Be the first to comment!
Leave a Comment